Find quick setup guides for setting up Pine Telephone Company supported routers, modems, and handsets

Macintosh OS X – Wireless Connection Guide

This document will provide basic wireless network connection procedure for the Macintosh OS X operating system.

Step 1:  Click the AirPort icon, located at the top right corner of your screen. In the drop-down menu that appears, make sure Wi-Fi is On.

Step 2: Select the SSID “Pine LTE”. Ensure that “Remember this network” is check marked.

wifi_connection_macosx_1

Step 3:  Enter the Wi-Fi Key. (Hint: There are no letter O in the key. All letters are UPPERCASE.)

Step 4:  Click Join to establish connection.

wifi_connection_macosx_2


Related Links


Windows 7/Vista – Wireless Connection Guide

This document will provide basic wireless network connection procedure for the Microsoft Windows 7 and Vista operating system.

Step 1:  Open the Control Panel.

Step 2:  Locate the category Network and Internet or Network and Sharing Center.

wifi_connection_windows7vista_1

Step 3:  On Network and Sharing Center, locate View your active networks and click Connect to a network. If the PC is connected to another network, click   Connect or Disconnect.

wifi_connection_windows7vista_3

Step 4:  The computer will search for all available SSID. Select the SSID “Pine LTE”. Ensure that “Connect automatically” is check marked. Click Connect.

wifi_connection_windows7vista_2

Step 5:  Enter the Wi-Fi Key. (Hint: There are no letter O in the key. All letters are UPPERCASE.)

Step 6:  Click Ok to establish connection.


Related Links


Windows 8 – Wireless Connection Guide

This document will provide basic wireless network connection procedure for the Microsoft Windows 8 operating system.

Step 1:  Open the Charms bar by pressing Windows + C on your keyboard. Alternatively, if you have a mouse, move the cursor to the upper right corner of the screen until the Charms bar appears along the right edge of the screen. If you have a touch-enabled device, swipe from the right edge of the screen to bring up the Charms bar.

Step 2:  Click Settings .

wifi_connection_windows8_1

Step 3:  Click on the Network icon.

wifi_connection_windows8_2

Step 4:  Select the SSID “Pine LTE”.

Step 5:  Ensure that “Connect automatically” is check marked. Click Connect.

wifi_connection_windows8_3

Step 6:  Enter the Wi-Fi Key. (Hint: There are no letter O in the key. All letters are UPPERCASE.)

Step 7:  Click Next to establish connection.


Related Links


BEC 6200WZL – Quick LAN and WLAN Connection Guide

This document is intended to provide a quick LAN and WLAN connection Guide for the cellular broadband router BEC 6200WZL. To begin, ensure that you have all the basic package contents upon unboxing.


PACKAGE CONTENTS

bec6200wzl_packcontents

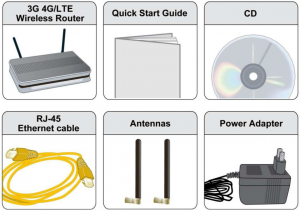
  • BEC 6200WZL 4G/LTE Broadband Router
  • This Quick Installation Guide
  • CD containing User Manual
  • RJ-45 Ethernet Cable
  • Two 3G/4G-LTE detachable antennas
  • Power adapter


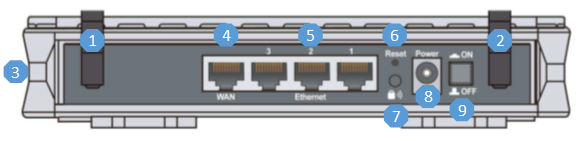
REAR PANEL CONNECTORS

bec6200wzl_rear_connectors

NUMBERPORTMEANING
1-2LTE AntennaScrew in the supplied antennas; Main antenna (1), must be connected (1); Auxiliary antenna (2)
3SIM Card SlotInsert the SIM card with the gold contact facing down. Listen for a soft “click” to indicate SIM card is locked in. Push the SIM card inwards to eject it.
4WANConnect to Fiber/Cable/xDSL Modem with RJ-45 as an alternate internet source; this can also be used as a regular LAN port
5Ethernet LAN (1~4)Connect an Ethernet cable to one of four (including the WAN port) LAN ports when connecting a PC or a 100Mbps network
6ResetReset button restores unit to Pine’s factory default configuration
7Wireless On/OffPress & hold the button for more that 6 seconds to On/Off the wireless LAN
8Power Jack (DC)Connect the supplied Power Adapter to this jack
9Power SwitchPower ON/OFF switch


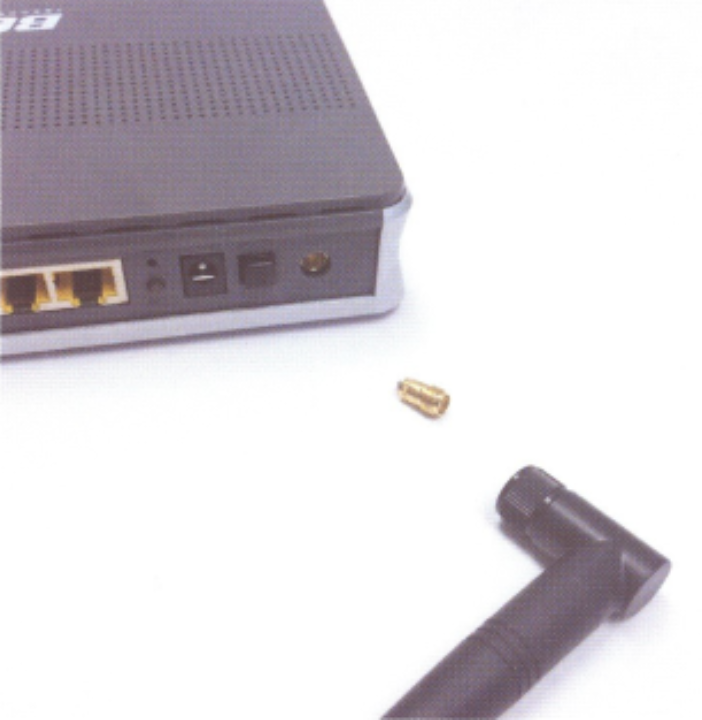
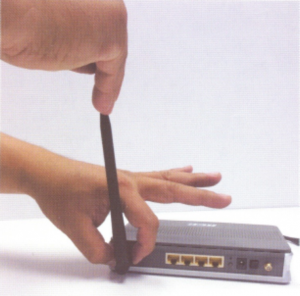
ANTENNA INSTALLATION

Grasp top of antenna with one hand and screw the base in with the other

bec6200wzl_install_antenna_1

DO NOT rotate the entire antenna around the unit during installation

bec6200wzl_install_antenna_2

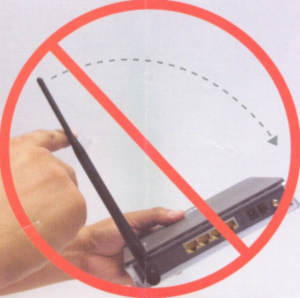
Improper installation of the antenna can cause the connector to snap from the unit

bec6200wzl_install_antenna_3


ETHERNET LAN CONNECTION GUIDE

  1. Power on the BEC 6200WZL router.
  2. Connect the supplied RJ-45 Ethernet cable to one of the LAN ports and the other end of the cable to the PC’s Ethernet interface.
  3. Provide a few seconds for connection to establish.
  4. Verify that front panel Ethernet light(s) is on.

bec6200wzl_ethernet_connection

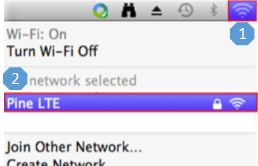
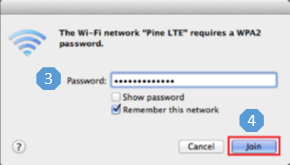
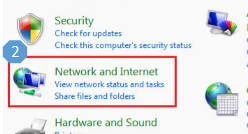
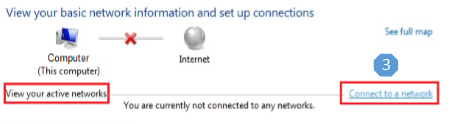
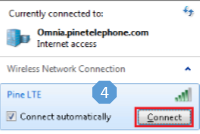
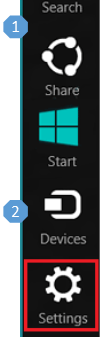
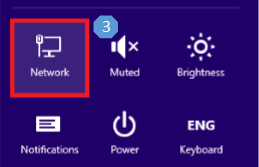
WIRELESS LAN SETUP GUIDE

Before starting the wireless LAN setup, verify the wireless key located on the bottom on the BEC 6200WZL router. Find it on a sticker labeled “Wi-Fi Key”. If this key is not available, contact Customer Support on the numbers  provided on the other page and request the wireless key.

bec6200wzl_wlan_connection

Prepare the BEC 6200WZL Router for connection:

  1. Power on the BEC 6200WZL router.
  2. Ensure that the antennas are properly connected.
  3. Verify that the router is online by checking the Internet light. Green light means the router is online.

If the light is orange, power off the router and remove the SIM card. Wait for about 5 seconds, insert the SIM card again, and power on the router. If the router remains offline, contact Customer Support for assistance.

  1. Once you confirm that the router is online, you are ready to begin wireless network connection. Part of this procedure will vary depending on your operating system.


Wireless Connection Procedures For Common Operation Systems