Setting Up Email on Thunderbird
The following article below will demonstrate how to setup your Pine-Net email account with Mozilla Thunderbird. Let’s take a look at the steps below to get you going:
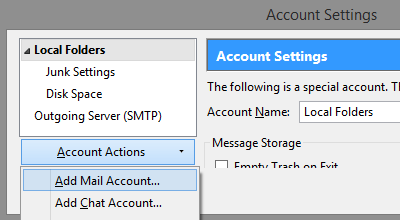
- Let’s go ahead and open Thunderbird, select Tools, Account Settings, Account Actions, and then click Add Mail Account.

- On the Mail Account Setup, enter Your Name, full Email Address, and Password. Click Continue to proceed.

- The Mail Account Setup will attempt to verify the account. Click Manual Config button.

- Your Name – This is the name that will appear in the From field of messages you send.
- E-mail Address – Enter in your entire email address (e.g. customer@pine-net.com).
- Account Type – Select IMAP from the drop-down menu.
- Incoming mail server – Enter the following: mail.pine-net.com, Port: 143, SSL: None, Authentication: Normal Password
- Outgoing mail server (SMTP) – Enter in the following: mail.pine-net.com, Port: 25, SSL: None, Authentication: Normal Password
- User Name – Enter in your entire email address (e.g. customer@pine-net.com).
- Password – Enter in the password for the account you’re setting up.
- Click the More Settings button, then click the Outgoing Server tab and select the My outgoing server (SMTP) requires authentication check box. Leave the default setting “Use same settings as my incoming mail.”
- Click the Done.
Mapping your IMAP folders
Folders should sync automatically with an IMAP account; however, if for any reason they aren’t, perform the following steps:
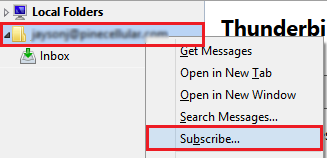
- Right-click on your email account and select Subscribe.
- Select any folder you would like to subscribe or click the INBOX checkbox to select all. Click Subcribe to begin syncing.
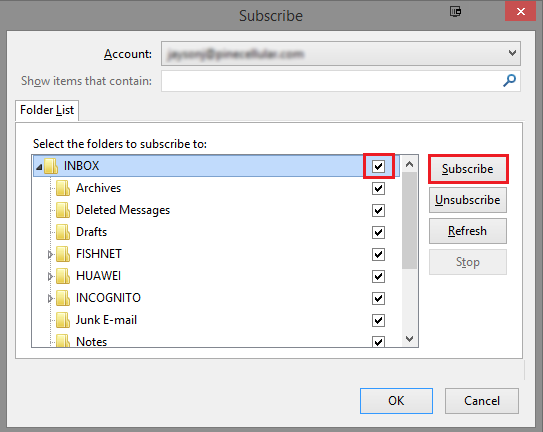
- To Unsubscribe to any folders, repeat the following steps and select Unsubscibe instead..
Note: If you’ve created any new folders through webmail and they aren’t displaying, right-click on your Inbox or top level folder of your email account and select Update Folder List.