Find procedures for setting up email clients and device firmwares on the most common operating systems and devices.

Setting Up Email on Android

The following steps are required to configure email on most Samsung branded Android phones or tablets:

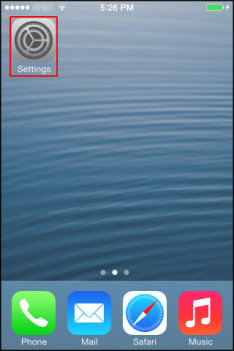
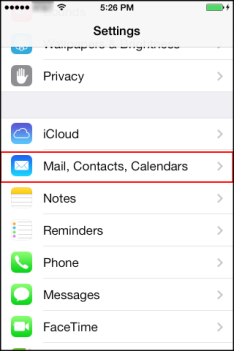
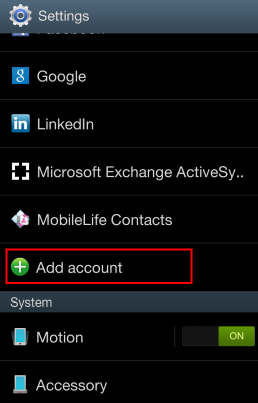
Step 1.   Locate your Settings icon within your App Drawer. Within Settings, scroll down and select Add Account.

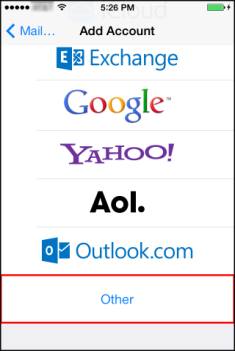
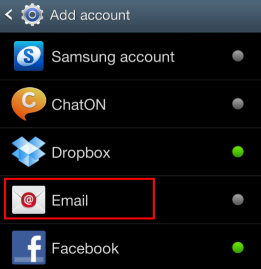
Step 2.   Select Email from within the Add account section.

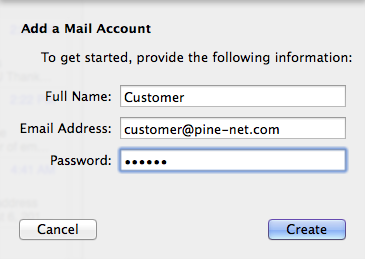
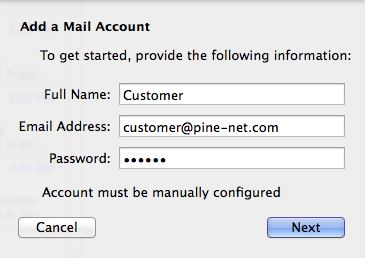
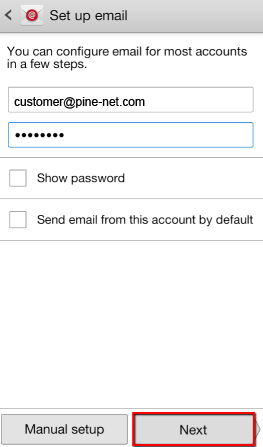
Step 3.   Enter your Email Address and Password, then select Next.

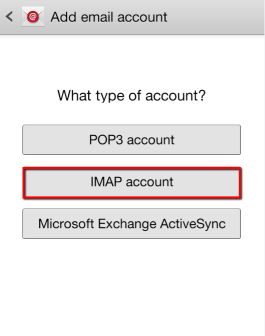
Step 4.   Select IMAP for Account Type.

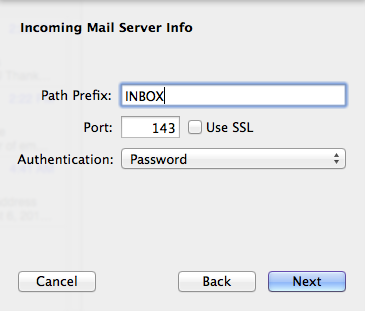
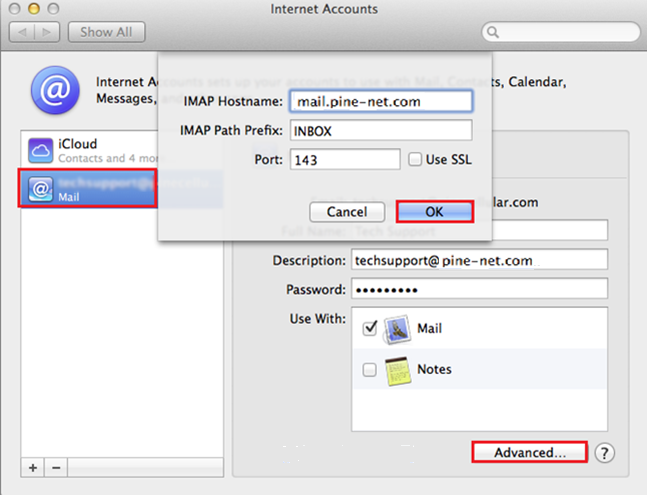
Step 5.   Enter the following information for Incoming server settings:

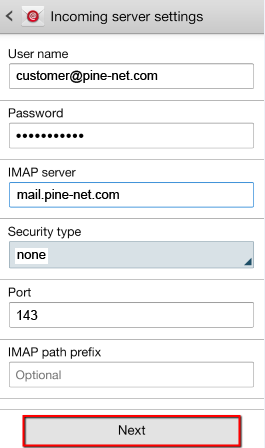
  • Username: Your complete email address (e.g. customer@pine-net.com)
  • Password: Your email address password
  • IMAP server: mail.pine-net.com
  • Security type: none
  • Port: 143

Then, click Next.
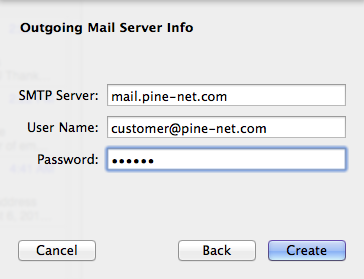
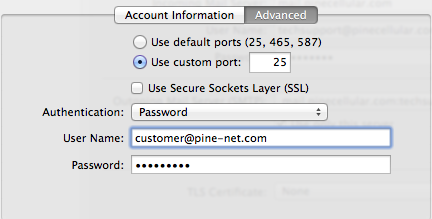
Step 6.   Enter the following information for Outgoing server settings:

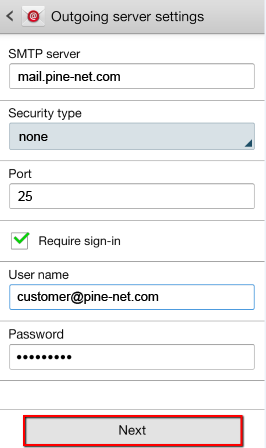
  • SMTP server: mail.pine-net.com
  • Security type: none
  • Port: 25
  • Require sign-in: Must be check-marked
  • Username: customer@pine-net.com
  • Password: Enter password

Then, click Next.

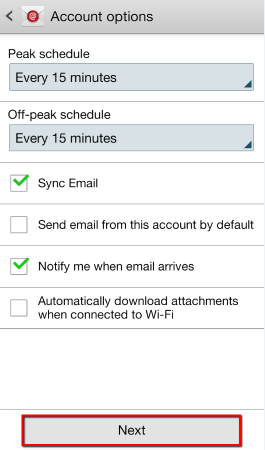
Step 7.   Click Next on this screen.


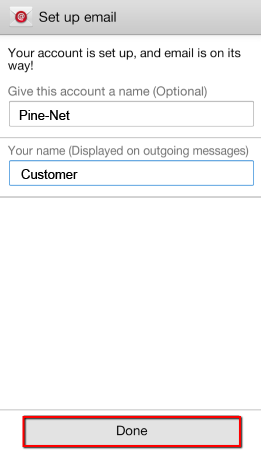
Step 8.   Feel free to name your account and edit the name, then select Done to complete the setup.

Setting Up Email on Apple iOS

This article will configure an IMAP account on your iOS device. We recommend that you use IMAP when configuring and managing your hosted mail account with an email client.

Note: The images in this article will show an iPhone 5s running iOS 7. Though screens on other iOS devices will differ in appearance, the process is the same.

Step 1.   From the home screen on your device, tap Settings, and then tap Mail, Contacts, Calendars.


Step 2.   Tap Add Account > Other > Add Mail Account.


Step 3.   On the New Account screen, enter the following information, and then tap Next.

  • Name – Enter in your first and last name. This name will appear in the From field of messages you send.
  • Email – Enter your entire email address (for example, customer@pine-net.com).
  • Password – Enter the password for your email account.
  • Description – Enter a descriptive name for the account (for example, Pine-Net). This description will only be visible to you.

Step 4.   After the device looks up your account, tap IMAP at the top of the screen.

Step 5.   Enter the following information in the Incoming Mail Server and Outgoing Mail Server fields:

  • Host Name – Enter the following secure server name: mail.pine-net.com
  • User Name – Enter in your entire email address (for example, customer@pine-net.com)
  • Password – Enter in the password for your email account.

Step 6.   Tap Next and then tap Save. The device verifies your settings. After the settings are verified, the Mail & Notes screen is displayed.

Setting Up Email on Mac Mail

The following article will show you how to setup your Pine-Net email account using your Mac Mail email client. Let’s take a look at the steps below on how to configure your account:

  1.   First thing you’ll want to do is open up Mac Mail and select Mail and Accounts.

  1.   On Internet Accounts, click the + sign or Add Other Account. Select Add a Mail account and then click Create.

  1.   Enter the required information on Add a Main Account. Click Create. After verification, you will be asked to manually configure account. Click Next.


  • Full Name – Enter in your first and last name. This is the name that will appear in the From field of messages you send.
  • Email Address – Enter in your entire email address (e.g. customer@pine-net.com).
  • Password – Enter in the password associated for your email account.
  1.   Enter the Mail Server Info
  • Account Type – Click IMAP button.
  • Incoming mail server – Enter the following: mail.pine-net.com, Path Prefix: INBOX, Port: 143, leave Use SSL unchecked, Authentication: Password
  • Outgoing mail server (SMTP) – Enter in the following: mail.pine-net.com, Port: 25, leave Use SSL unchecked, Authentication: Password
  • User Name – Enter in your entire email address (e.g. customer@pine-net.com).
  • Password – Enter in the password for the account you’re setting up.


  1.   Ensure that Incoming Server settings are correct. Select the account and click Advanced. Verify the IMAP settings. Click OK.
    Ensure that Outgoing Server settings are correct. Click Mail and Preferences. On Accounts, click Outgoing Mail Server (SMTP) to open the drop down box. Click Edit SMTP Server List.


  1.   Ensure that Outgoing Server settings are correct. Click Mail and Preferences. On Accounts, click Outgoing Mail Server (SMTP) to open the drop down box. Click Edit SMTP Server List.

Setting Up Email on Thunderbird

The following article below will demonstrate how to setup your Pine-Net email account with Mozilla Thunderbird. Let’s take a look at the steps below to get you going:

  1.   Let’s go ahead and open Thunderbird, select Tools, Account Settings, Account Actions, and then click Add Mail Account.


  1.   On the Mail Account Setup, enter Your Name, full Email Address, and Password. Click Continue to proceed.

  1.   The Mail Account Setup will attempt to verify the account. Click Manual Config button.

  • Your Name – This is the name that will appear in the From field of messages you send.
  • E-mail Address – Enter in your entire email address (e.g. customer@pine-net.com).
  • Account Type – Select IMAP from the drop-down menu.
  • Incoming mail server – Enter the following: mail.pine-net.com, Port: 143, SSL: None, Authentication: Normal Password
  • Outgoing mail server (SMTP) – Enter in the following: mail.pine-net.com, Port: 25, SSL: None, Authentication: Normal Password
  • User Name – Enter in your entire email address (e.g. customer@pine-net.com).
  • Password – Enter in the password for the account you’re setting up.
  • Click the More Settings button, then click the Outgoing Server tab and select the My outgoing server (SMTP) requires authentication check box. Leave the default setting “Use same settings as my incoming mail.”
  1.   Click the Done.


Mapping your IMAP folders

Folders should sync automatically with an IMAP account; however, if for any reason they aren’t, perform the following steps:

  1.   Right-click on your email account and select Subscribe.

  1.   Select any folder you would like to subscribe or click the INBOX checkbox to select all. Click Subcribe to begin syncing.

  1.   To Unsubscribe to any folders, repeat the following steps and select Unsubscibe instead..

Note: If you’ve created any new folders through webmail and they aren’t displaying, right-click on your Inbox or top level folder of your email account and select Update Folder List.

Setting Up Email on Outlook 2010

The following article below will demonstrate how to setup your Pine-Net email account with Outlook 2010. Let’s take a look at the steps below to get you going:

  1.   Let’s go ahead and open up Outlook, select Tools, Account Settings on the Email tab, and then click the New button.

  1.   If prompted, be sure that the Microsoft Exchange, POP3, IMAP, or HTTP box is checked, and click the Next button. Select the Manually configure server settings or additional server types check box and click the Next button.

  1.   Be sure that the Internet E-mail radio button is selected, and click the Next button and enter in the following information in the fields provided:

  • Your Name – This is the name that will appear in the From field of messages you send.
  • E-mail Address – Enter in your entire email address (e.g. customer@pine-net.com).
  • Account Type – Select IMAP from the drop-down menu.
  • Incoming mail server – Enter the following: mail.pine-net.com
  • Outgoing mail server (SMTP) – Enter in the following: mail.pine-net.com
  • User Name – Enter in your entire email address (e.g. customer@pine-net.com).
  • Password – Enter in the password for the account you’re setting up.
  1.   Click the More Settings button, then click the Outgoing Server tab and select the My outgoing server (SMTP) requires authentication check box. Leave the default setting “Use same settings as my incoming mail.”

  1.   Click the Advanced  tab, in both of the Use the following type of encrypted connection drop-down menus, select SSL. For the Incoming Server port enter in (143) and in the Outgoing Server port enter in (25).

  1.   Click the OK button, click the Next button, click the Finish button and then click the Close button. That’s it. You’re all done!


Mapping your IMAP folders

Folders should sync automatically with an IMAP account; however, if for any reason they aren’t, perform the following steps:

  1.   Right-click on your email account and select IMAP Folders and then Query.

  1.   Select any folder you would like to be subscribed to by right-clicking and selecting Subscribe. Repeat these steps for all folders you would like to be subscribed to.

  1.   To Unsubscribe to any folders, repeat the following steps and select Unsubscribe instead.

Note: If you’ve created any new folders through webmail and they aren’t displaying, right-click on your Inbox or top level folder of your email account and select Update Folder List.